...Oh My!
Since the beginning of October, I've been participating in "Knit-A-Longs" over at Ravelry. These are not really competitions per se, but rather fun opportunities to knit up something in a selected category and show your finished objects with the chance to win some awesome yarny prizes in random draws. The topic of three KALs I have entered are all "toys", as many knitters are making stuffies for Christmas giving.
I wanted to see if I could modify the bear pattern I used to make my Hudson the Polar Bear and Oreo the Panda into different animals - and came up with the idea of a set called "Lions and Tigers and Bears, Oh My!" (if you don't know, a reference to The Wizard of Oz). I drew out schematics with ideas of adding nose pieces, paws and tails to transform the bears into more feline shapes.
I also wanted to knit all three toys from my very own handspun yarn, so step one was to shop for fibre. Luckily our local yarn shop sells 100% Corriedale wool fibre in numerous colours by weight! So I picked out butterscotch yellow, grey, black and white.
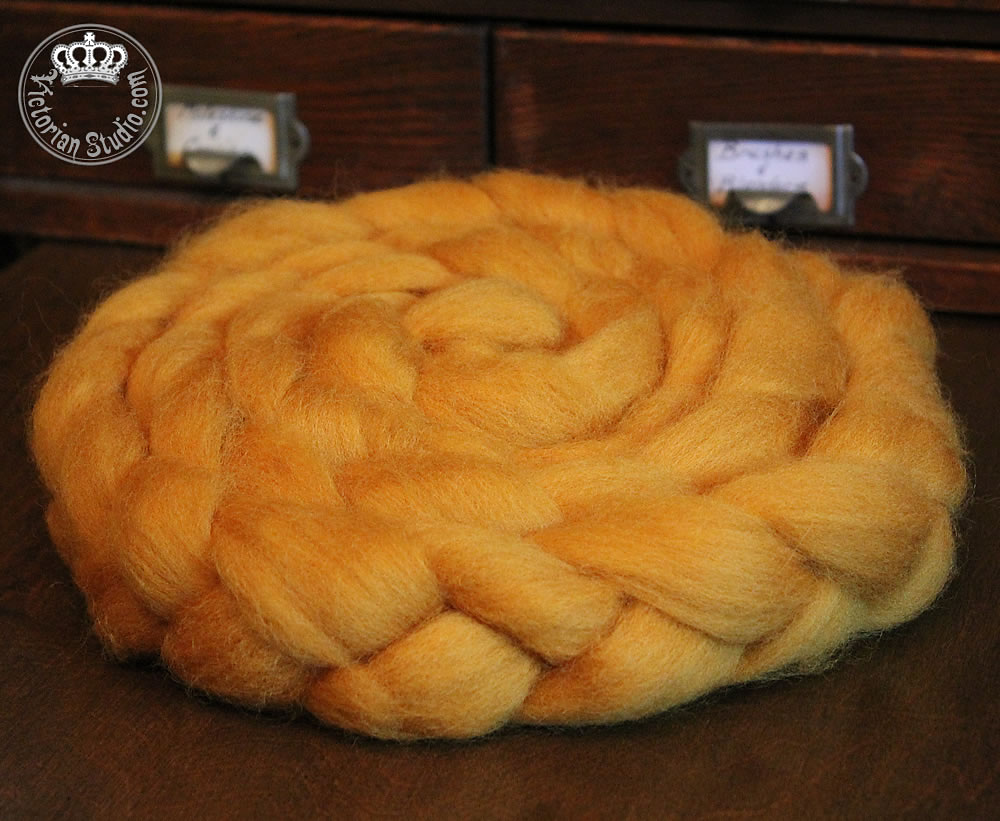
I started with the butterscotch and spun up a ball of single ply yarn using my Turkish spindle.
It knitted up so nicely - and it was great to be able to spin as much as I needed! Here are the arms getting stuffed and sewn together to make paws.
Then I thought the raw fibre would make the perfect mane and tail tuft... so I used a crochet hook to weave it into my knitting.
Here's my first toy - Butterscotch the Lion! He was so much fun to do and I love the way the mane turned out.
The next toy I wanted to make was a tiger from the same bear pattern - but I had to figure out how to make him the right colour with stripes! I found this fibre online called "Tigger" (how purrfect is that?). I began to spin it up, but wanted more of an orange result than it first gave me...
So I pulled the fibre apart into separate colours and spun it up individually, using just the orange and brown. As I knitted, I added in a few stitches of brown yarn here and there to make the tiger's stripes.
So here is Raja! I also used the white fibre for inside his ears, behind his eyes, on his muzzle and paws. I also used the brown yarn for the tip of his tail and around the outside edge of his ears.
The last of my set need to simply be a bear so I spun up some lovely grey and more white wool fibre.
The result? Greyson the Bear; again heavily modified from the initial pattern with the addition of white inside his ears, white face, muzzle, tummy and paws. He also has a tiny little grey tail. All three toys also have movable limbs - something the pattern didn't feature.
So here they are together: My "Lions and Tigers and Bears, Oh My!" set!
So much fun to create, and I love having them on display in my Studio knitting nook!
Sunday, November 23, 2014
Tuesday, November 11, 2014
Tim Holtz Tags of 2014 - November
Another month is speeding by, but for a change I did my November tag with plenty of time to spare!
As usual, I gathered what I thought I might need.
I began by using Tim's Distress Stain on the background of my tags, spritzing them with water to blend.
Then I layered his Dot Fade texture stencil over each tag and dabbed on Tarnished Brass Distress Paint to add a touch of shimmer.
I cut out corrugated cardboard using both his Tags & Bookplates and Tattered Leaves dies run through my Cuttlebug.
Next, Tim instructed us to tear up the cardboard to reveal some of the textures underneath.
Then ink them using his Walnut Stain ink.
I also sprinkled his Walnut Ink Distress Stain right from the bottle and spritzed them with water. I used the Tarnished Brass Distress Paint too by dipping a toothpick into the bottle and flicking it over my fingers to splatter on the cardboard.
Next I detached letters from the Ransom Alpha Parts set.
And painted them in brass.
After attaching the cardboard to the backgrounds, I added leaf details with a long brush and some Crushed Olive Distress Stain.
Since I didn't have the texture set he demonstrated with, I thought this would be a nice touch to bring out the leaf details.
I saved the oak leaf cutouts and inked them up in Forest Moss and Spiced Marmalade stains. I added even more orange with the Spiced Marmalade ink and again added details with Crushed Olive ink and a brush.
I outlined the tag with Walnut Stain and added two pieces of Trimmings ribbon.
Love the dimension and textures of this tag - even though up here in the Great White North the leaves fell quite awhile ago ...
...and there is snow on the ground already!
Friday, October 31, 2014
Happy Halloween!
Last week a little girl and her mom rang our doorbell; she was selling chocolates.
Naturally, hubby succumbed (okay, I would have too if I had answered the door).
After paying, her mother asked "So, are you doing a pumpkin again this year?"
I had to laugh. I guess the neighborhood has come to expect my annual carved decoration. Each year I do at least one real pumpkin, carved and lit up on our porch to greet young Trick or Treaters. This year is no different.
Yep, Indy is all set:
It looks better lit up
I seem to have also passed on the tradition too.... daughter came by last night and we carved one each.
In past years, I have also done foam pumpkins that can be re-used year after year. Like this pair of Jacks:
Snoopy
Or Dracula
I have decorated with both vintage and not-so-vintage Halloween items around the house:
So we're all set. We'll put in a pizza, sit down at our "Nightmare" adorned table, throw on a spooky movie and wait for the kiddos to arrive.
Naturally, hubby succumbed (okay, I would have too if I had answered the door).
After paying, her mother asked "So, are you doing a pumpkin again this year?"
I had to laugh. I guess the neighborhood has come to expect my annual carved decoration. Each year I do at least one real pumpkin, carved and lit up on our porch to greet young Trick or Treaters. This year is no different.
Yep, Indy is all set:
![]() |
![]() |
![]() |
Snoopy
Or Dracula
I have decorated with both vintage and not-so-vintage Halloween items around the house:
So we're all set. We'll put in a pizza, sit down at our "Nightmare" adorned table, throw on a spooky movie and wait for the kiddos to arrive.
![]() |
Monday, October 27, 2014
Tim Holtz Tags of 2014 - October
Ah Halloween! My second-favorite holiday after Christmas. Such fun to decorate and prepare for... so this month's tag was both a trick and a treat to create. I got out the stash I thought I would need. As it turned out, I changed my mind part way through as you'll see...
First I cut out two tags (one for me, one for The Scrapbook Cottage) in both cardstock and chipboard (for stability) from Tim's Tag & Bookplates Bigz Die. Then I taped down his "Shatter" Layering stencil over the tag - even though this simulates broken glass, I think it also looks like a spider web.
I spread gesso over the delicate stencil with a palette knife - and after carefully lifting it off, was relieved to see this technique worked! I set the tags aside to dry where little feline paw prints wouldn't ruin them - a necessity when you are creating in a small room where three cats HAVE to keep you company and watch exactly what the heck you are doing at all times.
Next I got out a Graphic 45 Halloween stamp of a black cat - now this is where I deviated from my initial plan... I was going to do a pumpkin with "Boo" spelled out underneath in Scrabble tiles (similar to Tim's sample), but instead of using my own hand-drawn pumpkin (I have a few in my Digidrawn store), I thought this cat would be perfect for a frightening scene with a large spider in the web.
So I stamped the cat with Ranger's Archival black ink, coloured in the edges and shaded a bit with Tim's Distress markers (Black Soot and Spiced Marmalade) and topped it off with Glossy Accents (as he demonstrated on his pumpkin).
For the spider, I simply went into the dining room where I had a few rubber spiders sitting in the bowl of candy (why yes, I DO have a bowl just for us with the best of the chocolate bars and candy... doesn't everyone?)
*Ahem* But I digress... so I brought two spiders into my studio and added some Black Diamond Stickles to their backs to jazz them up a tad. But then I once again changed my mind... (I seem to do that a lot)
Instead of a huge spider on each tag, I decided it would be even creepier to have just THE LEGS of the spider crawling into the edge of the tag... so I sliced one spider into two sets of legs and returned the other spider to guard the candy (which he is a total failure at, by the way).
For the charms, I used Tim's Cash Keys set. It comes with the metal backer and clear epoxy cover. All I had to add was a white oval cardstock piece that was inked on the edge and Tim's "Words" Rub Ons for the saying. I added the cardstock with Glossy Accents and pressed the epoxy cover over top.
Now that the tag backgrounds were dry, it was time to colour them in. We don't have any of Tim's new Distress Sprays that he uses in his demo up here yet (and I left it too late to order any online), so I got out my Distress Stains and made a mess.
Er, I mean, I "created an artistic background"... and a mess to be honest. Good thing I have his craft sheet to work on. I used Peeled Paint, Forest Moss, Dusty Concord, Wild Honey, Crushed Olive and Spiced Marmalade and went to town splattering and spraying with water for some cool effects.
The Graphic 45 Halloween stamp set also came with a stencil (and with all Halloween at 70% off at Michael's, it was a steal for $5) so I used that with Tim's Distress Black Soot ink and Mini Distress Tool to add some spooky sayings. I also used the black ink to darken the edges of the tags and added more purple with some Dusty Concord Distress ink here and there.
Now that my cats were dry, I added them with Glossy Accents and glued the cardstock tags to the chipboard backers with Scotch Quick Dry adhesive. I also coloured in the tag reinforcements and glued them on the front and back of each tag.
The spider legs were also attached with Glossy Accents, creeping in from the edge of the tag. A strip of black jute string was secured with the Tiny Attacher (a smaller version of a regular stapler).
The charm is held in place with ScorTape and secured to purple jute string looped through the tag hole.
Love the way the ink seeped into the cracks to create a web effect.
And the way the cat has spotted the arachnid...
Yeah. I do believe I would react the exact same way...
Happy Halloween!

Subscribe to:
Posts (Atom)


