Sunday, January 31, 2010

Easel Card


Yeah, I've been busy experimenting with new card techniques since I felt most of mine were all starting to look similar to me. So here is my first attempt at an "Easel Card". I think it turned out nice, but next time I would definitely make the bottom matted paper at tad smaller to show the punched border when it is properly set up. Ah well, practice, practice, practice! Pearls on the sentiment and up near the punched border add some bling and the top ones also act as stops when I open the card all the way. Otherwise, the sentiment, which is adhered with dimensionals, acts as the stopper when open.


Saturday, January 30, 2010

Magic Card


Well, maybe not "magic" per se, but I've seen this technique called that. It's simply the same image stamped twice: once on cardstock and coloured, then again on clear acetate. Bind them together at the top and make a slider card to insert it into.
Here's the Copics I used to colour it in:
I guess if I were to personalize this, I would lift up the acetate and write the greeting or sign it on the white cardstock.

Wednesday, January 27, 2010

New Cards

Been playing around with some new techniques, so I thought I would post a few recent cards.

Black and White Bird cardHere is a black and white card (I still haven't figured out what occasion it will be used for...) using a Cuttlebug embossing folder, and coloured in the bird with Copic # N zero.

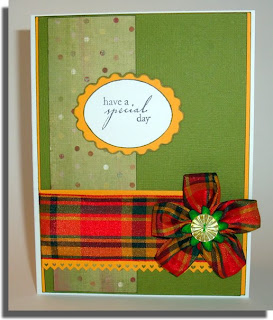
Special Day card This one I made after learning how to make ribbon flowers on Mary's great blog My Stampin' Dreams. Her wonderful video tutorials are full of great ideas; I know I will be trying more soon! I coloured in the button and foam center with Copics.

Birthday Wishes cardThis card was made after I finally brought my old sewing machine up into the craft room. I sewed the ribbon and patterned paper, added some buttons and stamped the sentiment.


Monday, January 18, 2010

Vintage Postal Scale

On the weekend, daughter and I visited an antique store at the Forks downtown. I fell in love with this vintage postal scale (I am unsure but probably early 1920's era) and thought it would make a great piece in the craft room. It's a great way to store my finished cards waiting to be used or "posted"! Now that I have a vintage printer's drawer, some vintage ink bottles (circa 1900) and this, I can definitely see my room becoming a mix of old and new.

Vintage Postal Scale
And when we got home, I had time to do a quick card. I had stamped two images and already coloured them in with my Copics, so this was easy to finish up with some patterned paper, edge punch and pearl bling.

Warm Wishes card

Saturday, January 16, 2010

Dragon Drawing

When I was in school (many, many years ago) a friend of mine and I would love to draw dragons togeter. He was a wonderful artist and I was amazed at his imagination. It's been way too long since I have drawn a dragon, so I took out some Copics and tried this first attempt.

Yeah, that was fun, so I know there will be more...

Copics used:


Wednesday, January 13, 2010

Cuttlebug!

Here's something I treated myself to before Christmas. With my 50% off coupon from Michaels, I finally splurged on a Cuttlebug. If you don't know what this is, it embossed and die cuts; without spending hundreds of dollars on the electronic versions. My 2009 Christmas cards were made using it. It cut out the window on the card, as well as embossing the fronts with snowflakes.

Here are three recent cards I made with the embossing folders.

Birthday Card

Now I don't have to hand-emboss anymore; which is a real pain to do properly!

Related Posts Plugin for WordPress, Blogger...